

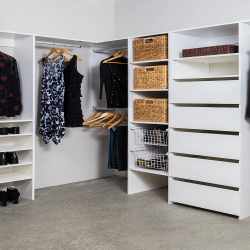
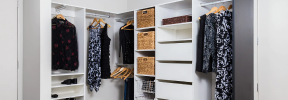


Assemble a Wardrobe Tower with Standard Drawers and Handles
This guide shows how to assemble a wardrobe tower using standard drawers with handles.
You can click on any of the images in this guide to enlarge them.
Before you begin
Included hardware

Wooden Dowels

Plastic Dowels

Fixed Shelf Studs

Euro Screws

Drawer Runners

Drilled Side Panels

Fixed Shelves

Back Support Panel
Recommended tools / hardware

Screwdriver

Impact Driver
Please note
The wardrobe shown in this guide is an example and your project may differ.
Whilst we supply all the screws needed for assembling your wardrobe towers, we don’t supply the screws needed for installation as these vary per project.
-
Install plastic and wooden dowels
Push the plastic and wooden dowels into the designated holes at the top of your side panels.
Wooden dowels should be in the first hole that is closest to the top edge of the panel.

-
Install first drawer runner
Position the first drawer runner on the drilled side panel, leaving 5 visible holes below the runner. Secure the runner using 2x Euro screws.
The lowest visible hole is for the bottom fixed shelf stud. The remaining 4 holes allow enough space for the drawer to sit above the bottom fixed shelf.

Note: This diagram shows installation for a wardrobe with drawers starting as close to the bottom of the tower as they can. If you are planning an open shelf below the drawers, make sure to plan for this before installing your first runner.
-
Install remaining drawer runners
Position the next drawer runner above the first runner, leaving 6 visible holes between the runners.
Secure each runner using 2x Euro screws. Continue this process for the required number of drawers in your tower.

-
Install fixed shelf studs
Install the fixed shelf studs for your bottom and top fixed shelves.
The bottom fixed shelf should sit below the bottom drawer, leaving 4 visible holes between the bottom runner and the bottom fixed shelf studs.
The top fixed shelf should sit above the top drawer, leaving 1 visible hole between the top runner and the top fixed shelf studs.

-
Install fixed shelves and back support panel
Slide the fixed shelves onto the studs and use a screwdriver to tighten the cams.
Position the back support panel on to the dowels at the top of the tower and use a screwdriver to tighten the cam.

Note: Ensure that the cam on your back support panel is facing towards the back of the tower so it will not be seen once the tower is installed against the wall.
-
Install second side panel
Position the second drilled side panel onto the fixed shelves and back support panel.
Once aligned, tighten the cams to secure the second side panel in place.

Note: Make sure the second side panel has matching fixed shelf studs and drawer runners installed before fitting it to the tower.
-
Stand tower up and fix to the wall
Carefully flip the tower onto its back, then lift it into a standing position.
Once in place, use screws (not supplied) to secure the tower to the wall.

Note: Wall fixing screws are not supplied as requirements vary between install sites. In most cases, 65mm screws are suitable for fixing a tower to a wall stud.
-
Insert prepared standard drawers
Slide your standard drawers into position on the runners by lining up the wheels on the runners and drawer sides. Lift the drawer slightly from the front to feed it into the runners.
Make sure your standard drawers are assembled before this step. You can follow our standard drawer assembly guide here.


Need a hand?
We’re always here to help!
Send us an email to info@cabjaks.co.nz or phone us on 09 274 6488 and we’ll point you in the right direction.