


Wardrobe Design Tips & Tricks
Smart wardrobe design makes storage feel effortless and keeps your clothes and accessories organised, visible, and easy to reach without wasted space.
You can click on any of the images in this guide to enlarge them.
-
1
Add a benchtop to one of your towers
You can create a dressing table style space by adding a custom benchtop to your order to sit inside one of your towers.
This gives you an additional surface to store perfume, jewellery and other items you reach for regularly.

Tip: Your benchtop will need to be slightly smaller than your tower width so it can sit inside the side panels. For example, a 900 tower will require an 866mm wide benchtop.
-
2
Use an extra top panel for more shelving
Cabjaks wardrobes are supplied flat packed and require assembly on site. This means you can amend and customise components to suit your needs.
You can add an additional top panel to your order, then cut it to suit and install it along the bottom of your wardrobe to create extra storage or a dedicated shoe shelf.

Tip: Additional screws or fixing methods may be required on site for any extra components purchased. Cabjaks supplies all hardware required to assemble drawers and towers.
-
3
Re-arrange tower layouts
Some people prefer to leave one or two shelves open at the bottom of a wardrobe for shoes, with drawers installed above.
While towers appear with evenly spaced drawers and shelves in the planner, once your components arrive you can install these in the layout that best suits your needs.

Tip: Remember the structural integrity of your tower. Each tower includes a back support panel and two fixed shelves which should be installed at even intervals to maintain rigidity.
-
4
Save cost and waste on hanging rails
You can add up the total span of all your hanging rail sections and purchase the closest longer rail length to reduce cost and material waste.
Rails are designed to be cut to suit during installation. If you plan to cut one rail into multiple sections, remember to purchase the correct number of rail support pairs.

-
5
Turn towers into floating towers
While towers typically sit on the floor of the wardrobe, they can also be installed as floating towers.
To do this, increase the number of back support panels for your tower from one to two. Install the second back support panel at the bottom of the tower and fix the tower securely into the wall at both the top and bottom.

-
6
Cutting out skirting boards during installation
Most wardrobes are installed against walls that have skirting boards along the bottom.
To allow the panels to sit flush against the wall, you will usually need to cut a small section from the back of the side panels so they can fit neatly over the skirting.

-
7
Install hanging rails last
During installation it is usually easier to assemble and secure the panels and towers first, then install the hanging rails once everything is aligned.
This allows you to measure the exact rail lengths required and gives you flexibility to adjust the rails if needed.

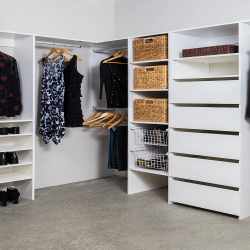
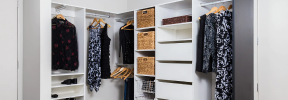
Inspiration Gallery
See beautifully-designed wardrobes that make the most of space, organisation, and style.


